


Welcome to Fairysnmypond artist Barbara England known as Fimp. Here I will share how I sculpt a doll with polymer clay. Subscribe to my youtube channel and watch all my video's for free. The whole process.
Subscribe To
Friday, July 31, 2015
Starting to paint my Mermaid
Well I started to paint and sorry to say but the camera doesn't show the brilliant colors and it's cloudy here and raining. When I get her mostly painted I will have a tutorial up just showing how I applied the paint and the products I have used. Making the tutorial as short as I can but all the information given to you. After I paint her I will do a few experiments on her tail fin I have a few idea's but need to experiment before I jump in. If I do there might not be a way to correct you know a done deal. Stay tuned as I move along and hopefully I will be ready for the tutorial and we will all get to see the finished mermaid.

Thursday, July 30, 2015
Update Let's Make a Mermaid she has been cooked
Update Let's Make a Mermaid. Well I lost count at 280 and I was no where finished with these sea foliage I call them lol. Im so pleased the armature and apoxie sculpt produced a very strong armature and held the polymer clay in position. Ok I can breathe easy... She is 12" without tail fin. See all of you in my tutorial going to finish her up and move on to my next project. What will it be? Well I have some idea's but I really want to feel it and then I will jump into my own world.


Wednesday, July 29, 2015
Update Let's Make a Mermaid How I insert arms
All that are following Lets Make a Mermaid here are pic I took explaining how I use 2part apoxie to insert the arms. This will not be in my tutorial because I think the pic explain it and the tutorial won't be so long.
Disclaimer this way is in no way of saying this is for everyone. This here sharing with you is what works for me and is so much easier then working with wires. I found by breaking my doll down into sections and using the Aves Apoxie Sculpt it gives me the strength, durability and the freedom to stage bake. Do not be afraid to experiment with your dolls and truly go outside of your box and find what works for you instead of following one way that you may struggle with because someone said to do it that way. Expand with yourself and thats when you will find your style.


Disclaimer this way is in no way of saying this is for everyone. This here sharing with you is what works for me and is so much easier then working with wires. I found by breaking my doll down into sections and using the Aves Apoxie Sculpt it gives me the strength, durability and the freedom to stage bake. Do not be afraid to experiment with your dolls and truly go outside of your box and find what works for you instead of following one way that you may struggle with because someone said to do it that way. Expand with yourself and thats when you will find your style.


Friday, July 24, 2015
Update Let's Make a Mermaid sea foliage for hair
Update Let's Make a Mermaid. Working on the sea foliage to make it flow like it would be her hair. Haven't gotten to the back yet lol.


Thursday, July 23, 2015
Update Let's Make a Mermaid WIP
Update Let's Make a Mermaid. Wanted to show what I have done so far. Most of the description is typed onto the pic. Will be back until she is finished. Sorry for the lighting with this is suddenly got very cloudy.


Wednesday, July 22, 2015
Colors I will be using for the mermaids tail on the sea foliage
Played with some colors for my mermaid tail and decided it will be like this. Off to experiment on some hair. Im almost ready to make another tutorial so you can see how Im putting this all together.


A new color I have discovered for doll eye's
Gave a class today and thought I would share this with all of you. I love the color and now I have to make another Tink with this color. I was never happy with my tinkerbells because I never could get the color I wanted. Im happy. Back to the mermaid.


Tuesday, July 21, 2015
Let's Make a Mermaid update!
Working on Mermaid tail I'm up to 120 of these sea foliage on her tail LOL.. Im going to let the clay rest at this point and then I will work on the upper torso. Make the holes in the shoulders so I can insert the arms. I will cut the wire off at the end of tail, make hole so I can insert the tail fin. One other thing I want to do. Where she is sitting Im going to take clay and make just the design of the foliage because I want her bottom that is resting to look finished and part of her. Im taking the nite off and Im going to go and watch some youtube video's from the event #lovesummerart. So many amazing artist if you love watching all kinds of art.


Monday, July 20, 2015
Update 3 how much I have done on the mermaids tail
Short video showing how far along Im on the mermaids tail. See you next time as Im further to attaching the arms. Hope to see you there please offer a thumbs up on my youtube not here on facebook. Comments and thumbs up supports me be able to bring you tutorials. Thank you for all the ones that are supporting me. hugs
Trouble with the forearm here's a tip that might help.
When I started to learn how to sculpt. I got the books out and I did some studying only to find there way of showing wasn't sinking in LOL.. I put the books down and view just a figure and started to find my own method of seeing shapes. When I that part sunk in I then started to understand better for myself. Sometimes by sharing a simple shape that we all know it can open the doors.
Here's a tip or shape I would tell anyone with the forearm. If you see something different then its right for you. We all are creative and not a written book that says you have to do it one way.

Here's a tip or shape I would tell anyone with the forearm. If you see something different then its right for you. We all are creative and not a written book that says you have to do it one way.

Sunday, July 19, 2015


Friday, July 17, 2015
#lovesummer art Lets make a mermaid
Just uploaded a tutorial on youtube. Lets Make a mermaid part 1. Tomorrow I will be showing what I have done with her tail. So please subscribe to my channel if you haven't. This tutorial is a collaboration with so many youtube creators that create art. In my tutorial I explain what it is and how long it will run.. Hope to see all of you there and you will find some wonderful new artist that will inspire you and expand in your own art. Thank you everyone for your support I am just so excited Im up to 4500 plus subscriber. Keeping art alive and flowing.
Click here to watch tutorial all free
https://youtu.be/hbE8uW3V8EY
Click here to watch tutorial all free
https://youtu.be/hbE8uW3V8EY
Monday, July 13, 2015
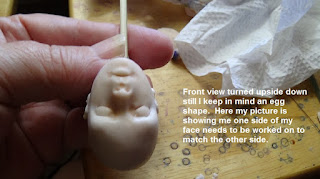
Some tips when sculpting a doll head
Here's some information for beginners. The explanation is typed on to the pictures. Hope this will help with some insight when sculpting a doll head.


Saturday, July 11, 2015
Questions asked about glass beads for doll eyes
Thought I would share this since I have been receiving emails asking questions about the glass bead eye's. Some have said to me what is the tip to drilling the iris in? I use a diamond bit called a burr. Another question was I have but mine doesn't want to really drill the hole what am I doing wrong. Well I really can't say what anyone would be doing wrong but I can give you my experiences. My diamond bit I have never replaced one yet and have used it not just on these glass beads but other things. I found for myself if I went for a little cheaper bit I had trouble. 2nd I found in my researching with glass suppliers that there are different quality of glass beads. Some will say glass but are (plexi glass) then there is acrylic glass. How do you tell what your getting? By the weight and feel. Glass has a feel to it and a heavy weight. As for drilling I found the drilling part not to corporate with the two types of glass I mentioned. When I payed attention to the feel and weight is when the drilling became what the diamond bit is able to do with glass.
So, the next time if you decide to buy glass beads pay attention and make your choices. After I learned there was a difference I was able to tell right away if it were solid glass.
So, the next time if you decide to buy glass beads pay attention and make your choices. After I learned there was a difference I was able to tell right away if it were solid glass.
Friday, July 10, 2015
Glass eye going for more iris design
Everything is an adventure along with experimenting. I love the creative world and I know by now to be patient but still lean towards no patients. Only because the creative juices flow strongly at times and could slow down a little LOL. Anyways to show another Glass bead eye Im trying all different ways to get patterns in the iris. This particular one I didn't let the center dry enough and went a little to far LOL. But I have to say I love those mishaps because it has led me to another thought. Hopefully it will be even better and you will get to see it of course. Always learning and always sharing.


Thursday, July 9, 2015
Making real Glass eye's
I wanted to share with everyone these pictures of glass eye's that I will be using on a commission. You will notice I never really stick with one thing Im always traveling around with experiments and just all different ways. If you haven't watched my tutorial on youtube Lets Make Eye's do so. Because the glass bead is drilled out the same way I showed with the wooden except you will need a diamond burr bit to drill. Glass beads are not painted the same way I used different transparent paints.


Subscribe to:
Comments (Atom)