

Click on Link and please leave all comments and likes on my youtube channel. By doing so it supports me so I may bring more video's. We have so much to share and lets expand in our art. Hugs
Welcome to Fairysnmypond artist Barbara England known as Fimp. Here I will share how I sculpt a doll with polymer clay. Subscribe to my youtube channel and watch all my video's for free. The whole process.
Subscribe To
Saturday, November 21, 2015
Tutorial sculpting the face for my bjd ball jointed doll
Click on Link and please leave all comments and likes on my youtube channel. By doing so it supports me so I may bring more video's. We have so much to share and lets expand in our art. Hugs
Friday, November 20, 2015
Wax Core starting over for a ball jointed doll head
Okay everyone so many of you have been asking me to please make another tutorial with the wax core for a ball jointed and show more detail. I started over and here is a tutorial just showing the wax core and I explain in detail. Im trying to keep these tutorials short but there will be many of them for this ball jointed doll. I hope this tutorial will answer your questions. Watch my next tutorial showing you an easy way to understand building a head into a shape.
Sunday, October 25, 2015
Color Wax sticks to paint polymer clay dolls or anything
Sharing this tip and I totally love using wax. For many of you asking how long I have been doing the wax its been about 14years that is with polymer clay. Been using wax over 30years on other mediums.
Thursday, October 22, 2015
Candle wax for my core worked well with my ball jointed doll
Hey everyone wanted to share something with all of you. One of my friends on youtube suggested that I try using the candle wax in a block. She uses it for her polymer clay dolls as well and she said its easy to carve but hard to slice. A lot cheaper then doll wax. I bought some yesterday and love it. I also used my wood burning tool to help with the slicing. Worked great so I posted some pictures as Im making a video.


Tuesday, October 20, 2015
Answers to questions about eyelashes, bjd, wax, tools, glass bead eyes
Saturday, October 17, 2015
How I make eyelashes for my ball jointed doll
Tutorial is up showing a method I use to make eyelashes with India Inks for my ball jointed doll. Next tutorial I will talk about pre made eyelashes. Im trying to keep the tutorials some what short. I will also be getting into the body. Thank you for viewing and please leave all comments and likes on my youtube channel so that I can make more video's for all that are interested.
Monday, October 12, 2015
Ball Jointed Doll painting the details tutorial coming
Update for all that are following me with my ball jointed doll. Will have my next tutorial on my art channel soon. My Technic how I paint the face details and what I use. Following after painting the details I will be working on showing how I make the torso. Will post here when I have them up. Hope to see many of you there and if you haven't made a ball jointed maybe after going through each step you will give it a try. Im hooked and have been for some time now. Every one I make I learn more and more. They are so much fun and will expand your art tremendously.


Monday, October 5, 2015
Polymer Clay and wax strongly used for ball jointed dolls
Another tutorial is up on youtube. This tutorial showing wax with polymer clay I strongly use this technic for ball jointed dolls. I also feel that wax restores your polymer clay and creates a porcelain look and feel to the polymer clay. Next tutorial I will move on to showing how and what I use for eyeliner and brows and I will be moving on towards the bjd body. Hope you enjoy and please leave all comments and likes on my youtube channel. By you doing this it supports me and I can keep creating more videos
Click below to view my tutorial on youtube. It's free and nothing to buy or direct you to any site other then my art channel. Many more video's available.
https://youtu.be/-ERmddlCRM0
Click below to view my tutorial on youtube. It's free and nothing to buy or direct you to any site other then my art channel. Many more video's available.
https://youtu.be/-ERmddlCRM0
Sunday, September 27, 2015
Coming Soon another tutorial for ball jointed dolls bjd
Coming soon another tutorial showing you my method of how I will restore the look of my cooked polymer clay specially ball jointed dolls. I have studied and experimented over years to perfect what Im looking for in bjd. Here's what I was looking for. 1. Thin as in thickness of body but strong. 2. Some what a transparent look (not see thru) A glass like feel. I have captured all of these things and much more for myself. Stick around next tutorial coming soon.
You asked tutorial showing how I set eye's in bjd using polymer clay
Tutorial is up for all of you that have emailed me and commented you wanted to see how I set ball jointed doll eyes. Stay tune for my next tutorial about ball jointed. Please leave comments and likes on my youtube channel. Thank you hope you enjoy.

Thursday, September 24, 2015
You have asked and I heard you!
You all have asked for me to show how I set my eye's in a bjd and I have heard you. Tutorial coming soon.
Friday, September 18, 2015
How I make my polymer clay dolls hollow for bjd
Ok you have asked and I have explained to many of you. Now this will show you..
Saturday, August 22, 2015
#pawgustart #sculpture Let's sculpt a small dog with polymer clay
#pawgustart Let's Sculpt a small dog tutorial is up on my youtube channel. I working on the hair today and hope to get the finished do uploaded today. This has been so much fun and hope that many of you will try it yourself or make something different. Please leave all comments and likes on my youtube channel. Thank you hope you enjoy. hugs
#pawgustart Let's Sculpt a small dog tutorial is up on my youtube channel. I working on the hair today and hope to get the finished do uploaded today. This has been so much fun and hope that many of you will try it yourself or make something different. Please leave all comments and likes on my youtube channel. Thank you hope you enjoy. hugs
Friday, August 21, 2015
#pawgustart #sculpting the whole dog
Guess what's coming! I said I was going to do the whole dog I couldn't stand not trying. Will let you know when its uploaded to my youtube channel. Hope to see ya there.


Thursday, August 20, 2015
Sculpting a dogs head #pawgustart #sculpture polymer clay
Well everyone I have my dogs head uploaded onto my youtube channel. I truly had so much fun and I saw it wasn't hard at all. Now that I stepped out of my comfort zone I want to tackle the whole dog and much smaller. I did this tutorial to encourage many of you to give yourself a chance to create something that you may not think you can. Starting today Aug 20th thru 22 on youtube there are many and I mean many artist that have created video's sharing there work. It's free and so full of information. Just type in youtube search #pawgustart and relax enjoy.. You could find some idea's for gifts to make. Hope to see ya there and please leave all comments and likes on my youtube channel. Thank you and will see you in my next tutorial. Stay tuned I will post here when I know what the next one will be.https://youtu.be/VQPaKGCnyJg
Wednesday, August 19, 2015
Stepping Outside of mybox coming soon
This has been inspired by a group Im involved. Stay tuned for these dates Aug. 20,21,22 on youtube many very talented artist will have video's they have created to share with all of you that wish to spend 3 days of nothing but art. Theme will be animal related. Hope to see all there and remember youtube is one of the greatest places to spend learning and watching how talented people are. Give them a thumbs up and if you feel like it they would love to hear a comment. These video's are free to you and many talented people are willing to share so many wonderful things with all. Thank you and I hope that many of you will find it in your hearts to do so for them and for yourself. Youtube wouldn't exist if it weren't for the creator's of the video's.
Well everyone going to do something a little different. Time to step out of my comfort zone and expand more with art At first I thought it was going to be difficult emotionally because I have just recently experienced my dog crossing over. Never an easy thing to go through and I have been through it my whole life. I have never been without a dog. This experiment or challenge I gave myself not only expanding my confidence in myself but it also gave me more healing with my own dog who is always with me but I don't need to feel the pain anymore. I will be uploading it to my art channel on youtube. Hope to see ya there and it will inspire any of you to something you might think you can't do. Expand with art because there is a beginning and there is no end. Will post here when its up. I thank all of you for your support so I can go on with my dreams and desires to share art with all who cross's my path. We are all in this together aren't we? Love life and always feel happy... hugs

Well everyone going to do something a little different. Time to step out of my comfort zone and expand more with art At first I thought it was going to be difficult emotionally because I have just recently experienced my dog crossing over. Never an easy thing to go through and I have been through it my whole life. I have never been without a dog. This experiment or challenge I gave myself not only expanding my confidence in myself but it also gave me more healing with my own dog who is always with me but I don't need to feel the pain anymore. I will be uploading it to my art channel on youtube. Hope to see ya there and it will inspire any of you to something you might think you can't do. Expand with art because there is a beginning and there is no end. Will post here when its up. I thank all of you for your support so I can go on with my dreams and desires to share art with all who cross's my path. We are all in this together aren't we? Love life and always feel happy... hugs

Friday, August 14, 2015
The pedal from Let's Make a Mermaid
I took a pic of the pedal from the tutorial I did. Its all dry so it dried less then 24hrs. They are just gorgeous and you never know what design they will give you. And you will never be disappointed. .


Thursday, August 13, 2015
Mermaid is now finished tutorial uploaded
She is finished and I want to thank all you that have followed along with me. You have inspired me so much with this one. See you in my next tutorial
https://www.youtube.com/watch?v=7dy3f6zvYMo
https://www.youtube.com/watch?v=7dy3f6zvYMo
Wednesday, August 12, 2015
Final and finished Let's Make a Mermaid is about to happen
Update Let's Make a Mermaid has been finished. At the moment I'm waiting for her to dry so I can add the photo's to the finished tutorial.. It should be up sometime tomorrow or the latest Friday. I will post when she is up. I really love her and proud of myself for stepping outside of my box and going for something I didn't think I was going to like... Never doubt yourself. I hope that it will encourage you to all step outside of your box and create something you would think not of yourself. See all of you soon.
Wednesday, August 5, 2015
I wanted to let everyone that has been following Lets Make a Mermaid that I haven't gotten as far as I planned due to our down pours of rain. Many people are flooded but no we don't flood where Im at. But we had many trees that came down and a huge yard clean up... Been working outside for 2 full days. Hopefully I will get this finished so I can move on. Thinking out her tail as I work outside LOL.


Saturday, August 1, 2015
Still moving along with Let's Make Mermaid.
I have finished her hair and I have moved on to her tail. The lighting here isn't good. Been raining for days and flooding for people have started. Im afraid I might run out of paint and I don't want to go out in this rain. Oh, well it will all get finished when its time.


Friday, July 31, 2015
Starting to paint my Mermaid
Well I started to paint and sorry to say but the camera doesn't show the brilliant colors and it's cloudy here and raining. When I get her mostly painted I will have a tutorial up just showing how I applied the paint and the products I have used. Making the tutorial as short as I can but all the information given to you. After I paint her I will do a few experiments on her tail fin I have a few idea's but need to experiment before I jump in. If I do there might not be a way to correct you know a done deal. Stay tuned as I move along and hopefully I will be ready for the tutorial and we will all get to see the finished mermaid.


Thursday, July 30, 2015
Update Let's Make a Mermaid she has been cooked
Update Let's Make a Mermaid. Well I lost count at 280 and I was no where finished with these sea foliage I call them lol. Im so pleased the armature and apoxie sculpt produced a very strong armature and held the polymer clay in position. Ok I can breathe easy... She is 12" without tail fin. See all of you in my tutorial going to finish her up and move on to my next project. What will it be? Well I have some idea's but I really want to feel it and then I will jump into my own world.


Wednesday, July 29, 2015
Update Let's Make a Mermaid How I insert arms
All that are following Lets Make a Mermaid here are pic I took explaining how I use 2part apoxie to insert the arms. This will not be in my tutorial because I think the pic explain it and the tutorial won't be so long.
Disclaimer this way is in no way of saying this is for everyone. This here sharing with you is what works for me and is so much easier then working with wires. I found by breaking my doll down into sections and using the Aves Apoxie Sculpt it gives me the strength, durability and the freedom to stage bake. Do not be afraid to experiment with your dolls and truly go outside of your box and find what works for you instead of following one way that you may struggle with because someone said to do it that way. Expand with yourself and thats when you will find your style.


Disclaimer this way is in no way of saying this is for everyone. This here sharing with you is what works for me and is so much easier then working with wires. I found by breaking my doll down into sections and using the Aves Apoxie Sculpt it gives me the strength, durability and the freedom to stage bake. Do not be afraid to experiment with your dolls and truly go outside of your box and find what works for you instead of following one way that you may struggle with because someone said to do it that way. Expand with yourself and thats when you will find your style.


Friday, July 24, 2015
Update Let's Make a Mermaid sea foliage for hair
Update Let's Make a Mermaid. Working on the sea foliage to make it flow like it would be her hair. Haven't gotten to the back yet lol.


Thursday, July 23, 2015
Update Let's Make a Mermaid WIP
Update Let's Make a Mermaid. Wanted to show what I have done so far. Most of the description is typed onto the pic. Will be back until she is finished. Sorry for the lighting with this is suddenly got very cloudy.


Wednesday, July 22, 2015
Colors I will be using for the mermaids tail on the sea foliage
Played with some colors for my mermaid tail and decided it will be like this. Off to experiment on some hair. Im almost ready to make another tutorial so you can see how Im putting this all together.


A new color I have discovered for doll eye's
Gave a class today and thought I would share this with all of you. I love the color and now I have to make another Tink with this color. I was never happy with my tinkerbells because I never could get the color I wanted. Im happy. Back to the mermaid.


Tuesday, July 21, 2015
Let's Make a Mermaid update!
Working on Mermaid tail I'm up to 120 of these sea foliage on her tail LOL.. Im going to let the clay rest at this point and then I will work on the upper torso. Make the holes in the shoulders so I can insert the arms. I will cut the wire off at the end of tail, make hole so I can insert the tail fin. One other thing I want to do. Where she is sitting Im going to take clay and make just the design of the foliage because I want her bottom that is resting to look finished and part of her. Im taking the nite off and Im going to go and watch some youtube video's from the event #lovesummerart. So many amazing artist if you love watching all kinds of art.


Monday, July 20, 2015
Update 3 how much I have done on the mermaids tail
Short video showing how far along Im on the mermaids tail. See you next time as Im further to attaching the arms. Hope to see you there please offer a thumbs up on my youtube not here on facebook. Comments and thumbs up supports me be able to bring you tutorials. Thank you for all the ones that are supporting me. hugs
Trouble with the forearm here's a tip that might help.
When I started to learn how to sculpt. I got the books out and I did some studying only to find there way of showing wasn't sinking in LOL.. I put the books down and view just a figure and started to find my own method of seeing shapes. When I that part sunk in I then started to understand better for myself. Sometimes by sharing a simple shape that we all know it can open the doors.
Here's a tip or shape I would tell anyone with the forearm. If you see something different then its right for you. We all are creative and not a written book that says you have to do it one way.

Here's a tip or shape I would tell anyone with the forearm. If you see something different then its right for you. We all are creative and not a written book that says you have to do it one way.

Sunday, July 19, 2015


Friday, July 17, 2015
#lovesummer art Lets make a mermaid
Just uploaded a tutorial on youtube. Lets Make a mermaid part 1. Tomorrow I will be showing what I have done with her tail. So please subscribe to my channel if you haven't. This tutorial is a collaboration with so many youtube creators that create art. In my tutorial I explain what it is and how long it will run.. Hope to see all of you there and you will find some wonderful new artist that will inspire you and expand in your own art. Thank you everyone for your support I am just so excited Im up to 4500 plus subscriber. Keeping art alive and flowing.
Click here to watch tutorial all free
https://youtu.be/hbE8uW3V8EY
Click here to watch tutorial all free
https://youtu.be/hbE8uW3V8EY
Monday, July 13, 2015
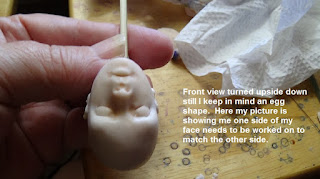
Some tips when sculpting a doll head
Here's some information for beginners. The explanation is typed on to the pictures. Hope this will help with some insight when sculpting a doll head.


Saturday, July 11, 2015
Questions asked about glass beads for doll eyes
Thought I would share this since I have been receiving emails asking questions about the glass bead eye's. Some have said to me what is the tip to drilling the iris in? I use a diamond bit called a burr. Another question was I have but mine doesn't want to really drill the hole what am I doing wrong. Well I really can't say what anyone would be doing wrong but I can give you my experiences. My diamond bit I have never replaced one yet and have used it not just on these glass beads but other things. I found for myself if I went for a little cheaper bit I had trouble. 2nd I found in my researching with glass suppliers that there are different quality of glass beads. Some will say glass but are (plexi glass) then there is acrylic glass. How do you tell what your getting? By the weight and feel. Glass has a feel to it and a heavy weight. As for drilling I found the drilling part not to corporate with the two types of glass I mentioned. When I payed attention to the feel and weight is when the drilling became what the diamond bit is able to do with glass.
So, the next time if you decide to buy glass beads pay attention and make your choices. After I learned there was a difference I was able to tell right away if it were solid glass.
So, the next time if you decide to buy glass beads pay attention and make your choices. After I learned there was a difference I was able to tell right away if it were solid glass.
Friday, July 10, 2015
Glass eye going for more iris design
Everything is an adventure along with experimenting. I love the creative world and I know by now to be patient but still lean towards no patients. Only because the creative juices flow strongly at times and could slow down a little LOL. Anyways to show another Glass bead eye Im trying all different ways to get patterns in the iris. This particular one I didn't let the center dry enough and went a little to far LOL. But I have to say I love those mishaps because it has led me to another thought. Hopefully it will be even better and you will get to see it of course. Always learning and always sharing.


Thursday, July 9, 2015
Making real Glass eye's
I wanted to share with everyone these pictures of glass eye's that I will be using on a commission. You will notice I never really stick with one thing Im always traveling around with experiments and just all different ways. If you haven't watched my tutorial on youtube Lets Make Eye's do so. Because the glass bead is drilled out the same way I showed with the wooden except you will need a diamond burr bit to drill. Glass beads are not painted the same way I used different transparent paints.


Friday, May 29, 2015
Let's Make Eye's Part Two Final Episode
Part Two is up on my youtube channel and is the final episode. If you haven't watched the first one I suggest you do before the second one here. The first one show's some very important steps that I found for myself in creating a very nice looking eyes for my dolls. Here in these tutorials I'm not using any generated paper for the iris, no femo, not plastic head pins or polymer clay for the eye. I hope you enjoy and will join in with me to create, share and to raise our vibration to align with more creative idea's. Click on the link below.
https://www.youtube.com/watch?v=4Ktw5L4MDb8
https://www.youtube.com/watch?v=4Ktw5L4MDb8
I'm posting this here because I have been receiving emails that many are experiencing the uv gel wants to pop off easily. You have to remember that the uv gel doesn't really want to adhere to anything that there maybe oil to it. How ever many of you choose to make your eye's consider wiping the inside of the iris with rubbing alcohol. As for my experiences the plastic head pins were the worst for me as the uv gel wanting to bead up on the white part and it would also separate from the inside of the iris wall of the inside of the eye. This is why I found the plastic head pins the uv gel would pop off very easy. I found by making the eye from wooden beads the uv gel adhere's to it so well. And then with that lip I showed in part 1 drilling out and part 2 the two examples of what it looked like without drilling the lip. My drawing isn't the greatest and hope it shows more why you need to make that lip. This way that Im sharing has taken a lot of studying and taking each part of the eye and breaking it down to capture what I wanted in my eye's. Now one more thing to mention. My way is not against anyone else's way because it may work for them and just not me. So, find your way and take it beyond mine. Having an openness in are own selves offers the sharing of art. Art is a creative place to be and when we share we raise the vibration for more idea's to come into existence of who we are and in each other.


Friday, May 22, 2015
I love making steampunk dolls and when I was experimenting I made this eye. Watch my tutorial Lets Make Eye's on my youtube channel to see the most important way to have a beautiful and unlimited to what you can put into the eye. When you have the basic you can make an eye like I did here. If your not a subscriber just type in the search on youtube fairysnmypond.


Thursday, May 21, 2015
Lets Make Eye's Tutorial is up and is Part 1
Hey everyone part 1 Lets Make Eye's is up on my youtube channel. I broke up the tutorial so it wouldn't be so long. Part one is getting ready, prepping, drilling. Part 2 is coming soon and it will show the painting and the finished eye. Hope you enjoy. Just click the link and it will take you to my youtube channel. Watch for free and subscribe if you haven't already.
https://www.youtube.com/watch?v=lat58Fw7Oo0Here is a sample picture of the eyes from the tutorial

Sunday, May 17, 2015
"NEW" Tutorial coming making eye's for your polymer clay dolls.
YES!!!!! I have finished the tutorial of my new way to make eye's. Im just so excited to share it with all of you and hope that it will help those that are wanting to make there own eyes for there dolls. The tutorial will be uploaded this week. Have to go over it and edit first. The picture below are the eye's from the tutorial but Im sharing this one with you and I will be taking another picture for the tutorial. Its cloudy and looks like a storm and Im getting to much reflection on the eyes right now. I will post here when its up. Hope to see many of you there and would love to here your comments on my youtube channel. Ok im off to edit see you this week. Everyone have a great and safe week.


Sunday, May 3, 2015
Wednesday, April 22, 2015
Hey everyone its been awhile since I have made a tutorial so today I did something very simple tip. Just needed to start somewhere. I also want to thank everyone for all the prayers, email, and just caring for a time in my life came a change. I just cannot thank all of you enough. Hope you enjoy what Im sharing today. Sharing is all about caring and I do care about all of you.. hugs
Wednesday, March 4, 2015
New toy
Well I think its time to say I have been so interested in the monster high dolls and the face ups. I have been learning for months now and taking notes of every idea that comes to me. I have experimented with some mediums and a friend let me try his air brush to see how I could create what Im looking for in my polymer clay dolls. I have to say as of today I ordered my air brush and it will be my new way of painting my dolls. So, in my up coming tutorials you will be seeing me air brush. I am just so excited and can't sit still. LOL
Tuesday, March 3, 2015
How to cut and style a short Bob wispy hair style for your doll
Everyone I finished the tutorial of how I made a Bob or Wispy hair style and it's on my youtube Channel. Hope you enjoy and as always I show the whole process and its free. Just subscribe to my art channel and watch more video's as I make them.
https://www.youtube.com/watch?v=ttaDe9yHR3w
https://www.youtube.com/watch?v=ttaDe9yHR3w
Monday, March 2, 2015


The pictures showing below will be another up coming tutorial on creating a bob hairstyle or something to look like one. In the pictures Im showing when you root the hair into a wig cap how you get that lift you need at the root. When gluing the ends of the hairs and gluing the ends to the head doesn't give you a natural look of the way our hair lays some what. So, I will be going for a short may be a wispy bob cut.. We shall see. Hope you join in on my art channel and as always I will post when I have the tutorial up. Thank you


Thursday, February 26, 2015
Showing an up coming tutorial another way to insert eye's I use this for ball jointed dolls
Wanted to share something here with all of you and tried hard to get a real clear pic but its so cloudy here. In this pic Im trying to show you a couple of things. One is another way I set eyes in and is basically a way I will do ball jointed. Second I wanted to show in the picture the foundation I used and what it looks like. Around the eye is raw clay and I thought you could see the difference in color. I will have a tutorial on this technique if you don't have an air brush. The way I applied it is somewhat different then my other way.

Wednesday, February 25, 2015
Think outside of the box
I wanted to share something with many of you back in art school my teacher gave us a project once a month and it was called Think outside of the box... She would put up a picture of us to all look at and we were all to write an essay and it had to be in story form and instructional of what idea we thought of. This was the biggest eye opener for me and to observe all the different idea's and thought patterns we all had over the same picture. Then the teacher picked the one she felt would be a great challenge for all of us and we had to take the idea and create it. It was also amazing to see all the different ways everyone created. Some were alike and many were different. Then the teacher said something that stuck with me and till this day I carry it on to others. She said now you see a picture and you all were to have thoughts about it. Then you were to go and create it. The question is do you feel you own your thoughts? Do you feel your the only one that can have a creative thought and no one else can have your thought. And if someone had one of your creative thoughts would you then feel like they took your idea? Well hopefully we all the know the answer to it all we really don't own any thought its already out there.
Today giving a class we had think out side of the box. Now I can't wait for all of us to play the game. Even me too!!! This is expansion and growth in your own self and art. I have taken many class's along time ago and sadly to say many teachers in a class just teach what your going to make. They don't go beyond the project and find the story form.. I found with great teachers that went further and outside of the project we learned so much and more then if we were to just sit there and watch the teacher show the steps and then you follow. I want to thank my students for giving me the opportunity to expand with myself.
Today giving a class we had think out side of the box. Now I can't wait for all of us to play the game. Even me too!!! This is expansion and growth in your own self and art. I have taken many class's along time ago and sadly to say many teachers in a class just teach what your going to make. They don't go beyond the project and find the story form.. I found with great teachers that went further and outside of the project we learned so much and more then if we were to just sit there and watch the teacher show the steps and then you follow. I want to thank my students for giving me the opportunity to expand with myself.
Sunday, February 22, 2015
New video how to make a wig cap and create a wispy hairstyle for your polymer clay dolls

Hope you enjoy will be making more video's on different hairstyles. Please subscribe to my art channel its free and I show you the whole process. Come and join in on my Facebook Fan Page would love to see you there and what your making.
https://www.youtube.com/watch?v=h5-xvME_-iE
Friday, February 13, 2015


Thursday, February 5, 2015
How I smooth my clay
Okay everyone thank you to my utube subscribers for your beautiful and many emails. So, your liking the tips. Alright here is one for today. Since I work with a very firm clay I don't have as much smoothing ability with my clay as most people do. Here is a tip that I truly cherish so much. View the pictures they will explain then decide if you would like to try it. If you don't like it then cook with it I love it and its so healthy. Also I use it for and eye cream and face. My hands to because the polymer clay tends to dry my hands out a lot. So, when I go to bed is when I use it not the day Im sculpting. Only if Im needing to smooth my clay.


Subscribe to:
Posts (Atom)